Auch wenn immer mehr Unternehmen zu Vasion Print als bevorzugte Druckmanagementlösung für Unternehmen wechseln, gibt es offensichtlich viele, die immer noch Druckserver verwenden – trotz der großen Anzahl an anhaltenden Druckproblemen mit Windows Server 2012 R2 . Gründe dafür gibt es viele. Zum einen herrscht Skepsis, ob unsere Druckmanagementlösung der nächsten Generation den Versprechungen tatsächlich gerecht wird. Zum anderen werden Veränderungen oft abgelehnt, weil das Gewohnte so vertraut ist, egal wie problematisch der Status quo auch sein mag. Ein weiterer Grund sind Bedenken über die Kosten der Migration und die Realisierung eines ausreichenden kurz- und langfristigen ROI.
Die Grundlagen
In diesem kurzen Blog-Beitrag werde ich nicht zu sehr auf spezifische Druckprobleme unter Windows Server 2012 R2 eingehen. Ich möchte stattdessen erklären, wie man einen Drucker unter Windows Server 2012 R2 hinzufügt und wie man einen Drucker unter Windows Server 2012 R2 konfiguriert. Dann vergleiche ich diesen Prozess mit dem weitaus optimierteren und leistungsfähigeren Ansatz von Vasion Print für das Druckmanagement.
Das grundlegende Druckmanagement unter Windows Server 2012 R2 unterscheidet sich kaum von früheren Versionen. Sofern Sie das Druckmanagement und die entsprechenden Rollen bereits eingerichtet haben, müssen Sie zum Hinzufügen eines Druckers unter Windows Server 2012 R2 wie folgt vorgehen:
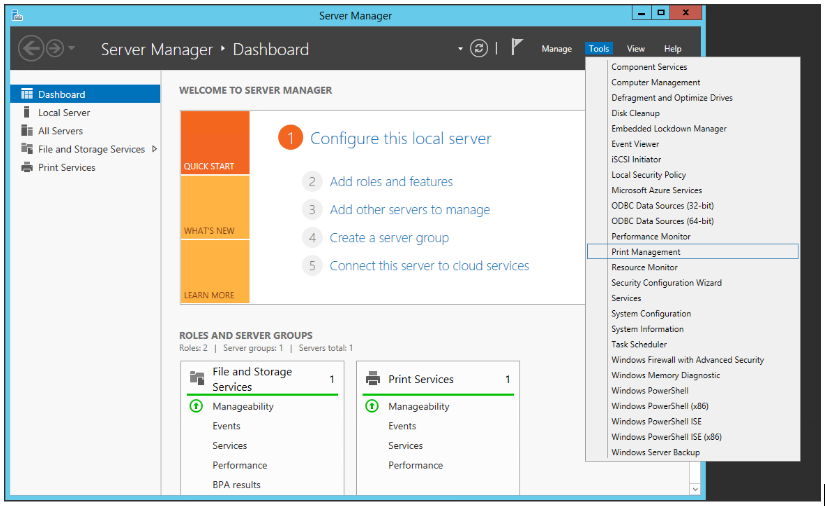
- Öffnen Sie die Druckmanagementkonsole „Print Management“ unter der Registerkarte „Tools“ im Server-Manager.

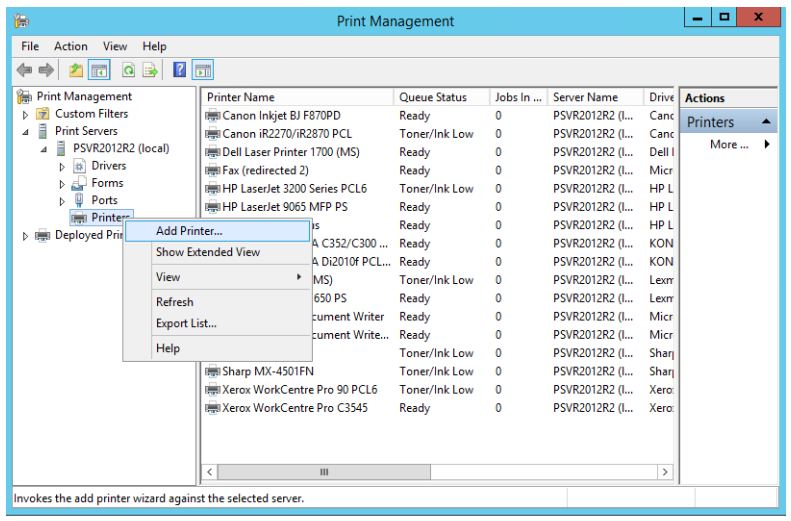
- Erweitern Sie den Baum „Print Servers“ (Druckerserver), um das Element „Printers“ (Drucker) anzuzeigen. Klicken Sie mit der rechten Maustaste auf „Printers“ (Drucker) und klicken Sie im Kontextmenü auf „Add Printer…“ (Drucker hinzufügen). Ein Dialogfeld für die Druckerinstallation wird angezeigt.

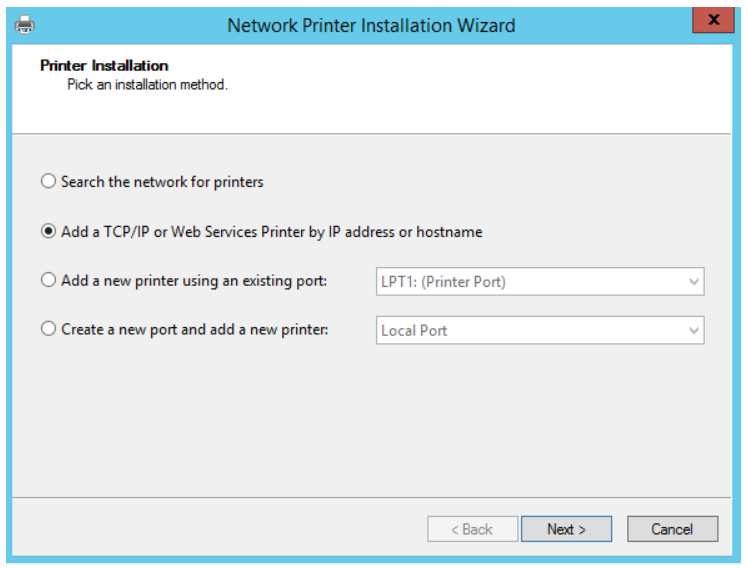
- Wählen Sie in diesem Feld Ihre bevorzugte Methode (z. B. TCP/IP, vorhandener Port, neuen Port erstellen).

- Abhängig von der von Ihnen gewählten Option wird Ihnen möglicherweise ein Feld zum Druckertreiber angezeigt. Wählen Sie die entsprechende Treiberoption aus und klicken Sie auf „Next“ (Weiter).
- Füllen Sie die Felder aus und aktivieren Sie das Kontrollkästchen „Share this Printer“ (Diesen Drucker freigeben). Klicken Sie zweimal auf „Weiter“.

- Klicken Sie auf „Finish“ (Fertig stellen), um den Vorgang zum Hinzufügen eines Druckers unter Windows Server 2012 R2 abzuschließen.
Die Konfiguration hängt von der Druckumgebung ab
Wenn Sie sich fragen, wie Sie einen Drucker unter Windows Server 2012 R2 konfigurieren müssen, dann ist das schon etwas nuancierter, da sehr viel von Ihrer speziellen Umgebung abhängt. Die meisten der erforderlichen Optionen finden Sie, indem Sie den entsprechenden Drucker im Druckmanagement suchen (siehe oben), mit der rechten Maustaste darauf klicken und „Properties“ (Eigenschaften) auswählen. Dadurch wird ein Dialogfeld mit mehreren Registerkarten angezeigt, darunter eine für allgemeine Einstellungen und spezifischere wie Sicherheit und Freigabe. Angesichts der Kürze dieses Beitrags kann ich hier nicht weiter ins Detail gehen. Ich möchte keine Einstellungen für Windows Server 2012 R2 vorschlagen, die zu schwer zu behebenden Druckproblemen wie Treiberkonflikten, Installationsfehlern oder Spooler-Abstürzen führen könnten.
Die Konfiguration einer Druckumgebung in Windows Server 2012 beinhaltet nicht nur die Einrichtung von Druckern und Druckservern, sondern auch die effektive Verwaltung und Überwachung der Druckernutzung. Mithilfe von PowerShell cmdlets können Administratoren detaillierte Berichte über Druckaufträge, Druckerstatus und die Gesamtleistung des Subsystems erstellen. Durch den Einsatz von cmdlets wie Get-PrintJob und Get-Printer können IT-Experten auf Echtzeitdaten zu Druckaktivitäten zugreifen, einschließlich der Druckmenge pro Benutzer, der Druckerauslastungsraten und des Auftragsstatus.
Darüber hinaus kann die Implementierung von Druckmanagementlösungen von Drittanbietern die Berichtsfunktionen wie Berichte über die Druckernutzung verbessern, sodass Unternehmen Trends im Druckverhalten analysieren, die mit dem Druck verbundenen Kosten verfolgen und potenzielle Bereiche zur Abfallreduzierung identifizieren können. Diese umfassende Überwachung ermöglicht eine bessere Ressourcenzuweisung, eine verbesserte betriebliche Effizienz und die Festlegung von Richtlinien, die verantwortungsvolle Druckpraktiken innerhalb des Unternehmens fördern.
Das Hinzufügen von Druckern ist einfach mit Vasion Print
Bei Vasion Print haben Druckerbereitstellung und -installation den Vorteil, dass sie sowohl vertraut als auch effizienter sind. Wenn Sie bereits wissen, wie Sie einen Drucker zu Windows Server 2012 R2 hinzufügen, finden Sie die webbasierte Benutzeroberfläche von Vasion Print einfach zu navigieren und intuitiv. Drucker können automatisch mit dem Migrationstool von Vasion Print oder manuell mit einem einfachen Kontextmenü hinzugefügt werden.
Gehen Sie zum Verwenden des Migrationstools wie folgt vor:
- Öffnen Sie in der Vasion Print Admin Console das Menü Extras und wählen Sie das Microsoft Print Server Import Tool.

- Wählen Sie die Drucker auf Ihrem Druckserver, einen Zielordner und dann den grünen Pfeil in der Mitte aus, um den Druckermigrationsprozess auszuführen, der die Drucker, Treiber und Standarddruckeinstellungen in Vasion Print kopiert.

Um einen Drucker manuell zu erstellen, gehen Sie wie folgt vor:
- Klicken Sie auf die Schaltfläche „Neu“ über der Ordnerstruktur in der Vasion Print Admin Console und wählen Sie „TCP/IP Printer“.

- Füllen Sie die leeren Felder aus, wählen Sie Ihren Treiber und klicken Sie auf „Add“ (Hinzufügen).

Darüber hinaus verfügt Vasion Print über ein zentrales Treiber-Repository, das die Installation, Zuordnung und Entfernung von Drucktreibern zum Kinderspiel macht. Es kann auch die häufigen Treiberkonflikte verhindern, die Druckerinstallationsprobleme und Spooler-Abstürze verursachen können, was wiederum zu Ausfallzeiten und zahlreichen Anrufen von wütenden Benutzern beim Servicedesk führt.
Druckserver vollständig beseitigen
Da Vasion Print in der Lage ist, Druckserver vollständig zu eliminieren, beseitigt es auch alle gängigen Druckprobleme von Windows Server 2012 R2 und verkleinert gleichzeitig Ihre Infrastruktur auf eine Einzelserverlösung, die mehr Funktionalität, höhere Verfügbarkeit und mehr Benutzerfreundlichkeit bietet als Server 2012 R2 oder seine Vorgänger. Vasion Print bringt die Druckverwaltung auf ein neues Niveau, sodass Sie und Ihre Supportmitarbeiter sich keine Sorgen mehr darüber machen müssen, wie Sie einen Drucker in Windows Server 2012 R2 konfigurieren und sich auf andere wichtige Aufgaben konzentrieren können.
FAQs zu Druckproblemen in Windows Server 2012
1. Was ist die Print Management-Konsole in Windows Server 2012?
Die Print Management Console (PMC) ist ein zentrales Verwaltungstool für Drucker, mit dem Administratoren Druckserver, bereitgestellte Drucker und Druckwarteschlangen über eine einzige Schnittstelle verwalten können.
2. Wie kann ich auf die Print Management-Konsole in Windows Server 2012 zugreifen?
Sie können auf die Druckverwaltungskonsole zugreifen, indem Sie printmanagement.msc in das Dialogfeld Ausführen oder die Eingabeaufforderung eingeben, nachdem Sie die Rolle Druck- und Dokumentdienste installiert haben.
3. Warum „verschwinden“ die Drucker aus der Liste „Verteilte Drucker“ in Print Management?
Dieses Problem kann aus mehreren Gründen auftreten, einschließlich Berechtigungsproblemen, Fehlkonfigurationen oder fehlenden Updates. Stellen Sie sicher, dass die Rolle „Druck- und Dokumentendienste“ ordnungsgemäß installiert und konfiguriert ist.
4. Welche Rolle muss auf dem Domänencontroller installiert sein, um Print Management zu verwenden?
Die Rolle „Druck- und Dokumentendienste“ muss auf dem Domänencontroller (DC) installiert sein, um auf die Druckverwaltungskonsole zugreifen zu können.
5. Wie installiere ich die Rolle „Print and Document Services“ auf einem Windows Server 2012 DC?
Gehen Sie zu Server Manager, wählen Sie „Rollen und Funktionen hinzufügen“, wählen Sie die Rolle „Dienste drucken und dokumentieren“ und schließen Sie den Installationsassistenten ab.
6. Kann ich Druckserver von einem Windows Server 2012 DC aus verwalten, ohne die Rolle Druck- und Dokumentendienste zu installieren?
Nein, Sie müssen die Rolle Druck- und Dokumentendienste auf dem DC installieren, um auf die Druckverwaltungskonsole zugreifen und sie verwenden zu können.
7. Was sind häufige Probleme bei der Bereitstellung von Druckern über die Gruppenrichtlinie in Windows Server 2012?
Häufige Probleme sind unzulässige Berechtigungen, Probleme mit der Netzwerkverbindung oder Fehlkonfigurationen der Gruppenrichtlinie. Überprüfen Sie immer, ob das Gruppenrichtlinienobjekt (GPO) korrekt verknüpft und getestet ist.
8. Gibt es bekannte Updates, die Probleme mit der Druckerbereitstellung in Windows Server 2012 verursachen können?
Ja, bestimmte Aktualisierungen können Probleme mit der Druckerbereitstellung verursachen. Es ist wichtig, auf bekannte Probleme im Zusammenhang mit bestimmten Updates zu prüfen und sicherzustellen, dass Ihr Server mit den neuesten Patches aktualisiert wird.
9. Wie kann ich Probleme bei der Druckbereitstellung in Windows Server 2012 beheben?
Beginnen Sie mit der Überprüfung der Ereignisprotokolle auf Fehler, der Überprüfung der Druckerberechtigungen, der Sicherstellung der ordnungsgemäßen Netzwerkkonnektivität und der Bestätigung, dass die Rolle „Drucken und Dokumentieren“ korrekt installiert ist.
10. Was sind die Unterschiede zwischen Print Management in Windows Server 2012 und späteren Versionen?
In späteren Versionen wie Windows Server 2016/2019 erfordert die Druckverwaltungskonsole nicht, dass die Rolle „Print and Document Services“ auf der DC installiert wird, was die Verwaltung von Druckservern ohne zusätzliche Konfiguration erleichtert.
11. Was ist zu tun, wenn der Befehl „printmanagement.msc“ nicht erkannt wird?
Wenn der Befehl nicht erkannt wird, stellen Sie sicher, dass die Rolle Druck- und Dokumentdienste auf Ihrem Server installiert ist. Wenn Sie versuchen, von einem DC darauf zuzugreifen, stellen Sie sicher, dass die Rolle dort installiert ist.
12. Gibt es eine Möglichkeit, Druckerbereitstellungen in Windows Server 2012 zu automatisieren?
Ja, Druckerbereitstellungen können mithilfe von Gruppenrichtlinieneinstellungen oder Skripten automatisiert werden, die PowerShell-Befehle verwenden, um Drucker zu Benutzerprofilen hinzuzufügen.

